We all are agree that the default WordPress Login form is a little lacking in style and branding. Well they have plenty of branding but just have to be WordPress branding but that’s not what most of us actually want to see. In today’s tutorial we’ll be taking
Actions Pack’s Login features that opens up a lot of possibilities when working with elementor forms. So let’s start creating a Login page or Popup. Few other features that we will be discussing in this tutorial are :
- Set up a redirection option where someone will be redirected after login into the site based upon his/her user role.
- Setting up Login through One Time Password (OTP)
We’re just going to add a new WordPress page giving this the title of Login. You may create a Popup as well. Edit the page using Elementor and now we need to drop-in the Elementor’s default form widget to the page. So now we just have a basic Elementor form. It doesn’t really do what we need.
We need to change a few things. First of all we are gonna create two basic fields Username and Password.
We’ll say username obviously because this is going to be required. We can jump to advance tutorial where we can set anything such an Email or Phone number instead of Username. We may allow users to input anything e.g Username or Email or Phone number.
We’ve edited our Elementor Form to give it a look of a normal login form. You may also style the form as you wish.
At the moment we just created an external structure of a Login Form using Elementor’s drag and drop capability. So now we need to change the Actions After Submit. We don’t want email action so we’re gonna remove it and add Login Action here.
Now we will take a look at all the parameters that are directly inside the Login Action. You can see we can choose to log in via
- Id and Password
- Id and OTP
- Id and OTP and Password
If you’re wondering what OTP is! It’s one time password, a 4 or 6 digit code that is sent to the User’s Email or Phone number while logging into your site. An OTP input screen is displayed to the user to verify the code sent earlier to his/her email.
Now we just need to map the fields from our form to the fields that are needed in the login action. we’re going to click on there where it says User Id, choose the form field that you had created for the username purpose. Then password is going to be password that’s all you realistically need to do.
Now we do have some extra options that really open up the functionality of what you can do with this plugin. we’ll look at though is the options for redirection and additional settings.
If you want to set the remember me option you can do that you just need to create a checkbox field in your form and map with the Remember me option inside the Login Action.
For redirection, now this is where we can choose what user levels will be redirected to what particular page of your site.
For example, you may want to send your administrators to go to your WordPress Admin page right after login successfully. You need to put the admin page url (http://yoursite.com/wp-admin) there. Whereas for the editor and the subscribers or any other roles if you want to send them to your custom front-end dashboard you may put its url e.g yoursite.com/dashboard.
If you want to reload the current page or send your users to the same page where they submit the login form then you just need to leave the redirection url field empty.
Then at the bottom you will see some additional options where you can set logout redirection url so that whenever your users try to logout from your site they will be a redirected to a custom link say your home page.
We also have a default Login page redirect option which means whenever anybody tries to access to log into our site using WordPress Default form (yoursite.com/wp-login.php) he will be sent back to your newly designed Login form using Elementor and Actions Pack.
Now this is important to bear in mind you can’t use relative links inside the redirection field. You have to use the full link including http, domain sub domains anything whatsoever e.g https://yoursite.com/dashboard.
Few other self explanatory options such as hide form and display logout link are also useful.
Hide form this will hide the form from logged in users so if you don’t want people to see the login page if they’re logged in then you can choose to set that to hide the form.
Display Logout Link option will help you display a Logout link in place of your login form. Note : You must enable Hide Form option to display the logout link.
FAQ
Why is my Login Redirection not working?
Please ensure that you have entered a full page url starting from http or https. E.g http://yoursite.com/dashbaord
How to customise my Logout Message?
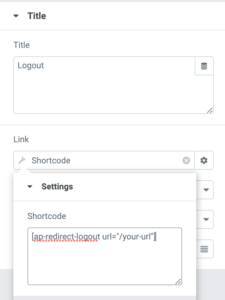
No such option is there in Login action to modify it. But we are on it and add a logout template soon in the future release.
However we have a workaround. Actions Pack provides you a Shortcode that is [ ap-redirect-logout url=”yoururl.com” ] which you can use in a link field of a heading widget with dynamic shortcode option.
How to redirect users to their Username page after login?
You can copy the shortcode from the Advanced section of the Username form field and paste it inside the Redirection Field. E.g yoursite.com/authors/[field id=”username”]
4 Responses
if i activate action pack plugin form all the time give me message
“You entered wrong credentials. Try again! ”
if i disable i can login with same credentials using standrd wordpress form.
how to find out what is the problem
I’m making a registration page. I’d like to set some minimum requirements for the password. Can I do that while also using actions pack?
The Logout shortcode is not working. Please help.
Please don't copy paste the shortcode, rather type it manually and check.