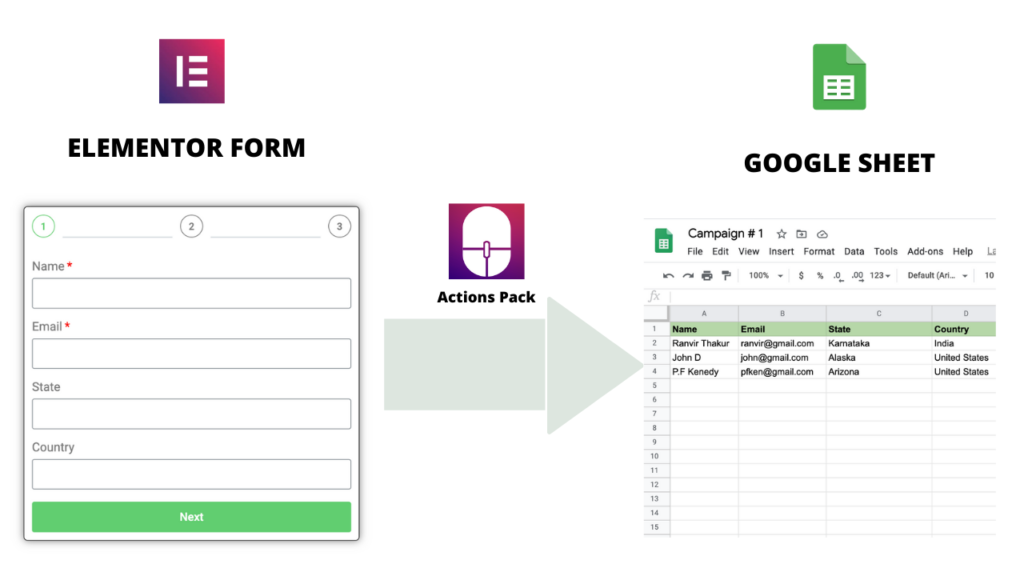
Looking to send leads from Elementor Form to Google Sheets or want to create an Elementor Google Sheets connection within a minute? Actions Pack makes it easy to create front-end Elementor forms to collect information from your leads.
With Actions Pack, you can create an unlimited number of forms in easy and simple steps. Create a form for your campaign using Elementor Pro’s default form widget, select Google Sheet from available actions, enter your Google Spreadsheet API credentials, and start collecting leads quickly.
In this post, I will show you step by step how to integrate Google Sheets with your Elementor Pro Form in 1 min.
Things You Need to Connect Elementor to Google Sheets
To follow this tutorial to integrate Google Sheets to your Elementor Forms, you’re going to need a few things:-
- Elementor Pro – You need the Elementor Pro plugin. Because you are going to use the power of Elementor’s native form widget.
- Actions Pack – Unlike Zapier’s monthly subscription, You need to purchase the Actions Pack plugin only once. Actions Pack creates a bridge between your Elementor Form and Google Spreadsheet
- Spreadsheet – Assuming you already have a Google account, you must have created a Spreadsheet or may create a new one here. Alternatively, if you want to send your leads to another spreadsheet that your colleague has already created, then ask him/her to share it with you. Just make sure that your Google Account has the access to that spreadsheet.
- Spreadsheet API Credentials – To allow Actions Pack write data into your Spreadsheet on behalf of you, you need to enter the Google Spreadsheet API credentials inside Actions Pack settings. Overall, you will create a Google Cloud project, enable the Google Sheets API for that project, copy your new API key, and paste it into the Actions Pack Setting. We will discuss it in later in this article.
1. Create Your Lead Capture Form
To get started you need to create a form using Elementor Pro’s Form widget. You have few options here, you may create your lead capture form on a page or popup or may place the Elementor template shortcode on an existing page.
Drag and drop Elementor’s form widget to your page or popup. Create as many fields as you want.
2. Select Google Sheet in Actions After Submit

Once you’ve designed your form, select Google Sheet in Actions After Submit settings. This is what lets you connect your form to Google Sheets.
3. Configure Google Sheet Action
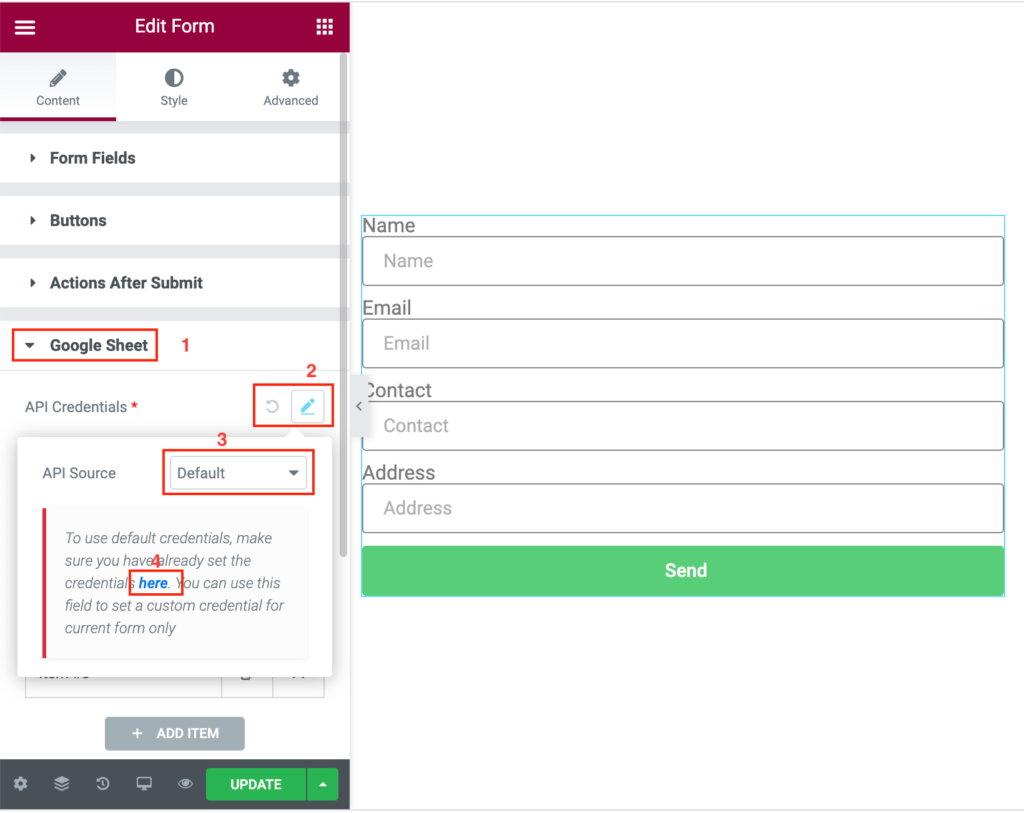
As soon as you select Google Sheet in Actions After Submit, you will be able to see all settings as shown in the image above.
First, you need to configure API Credentials. You have two options here.
- Default Source – If you select the default source, you need to set the API credentials here /wp-admin/admin.php?page=elementor#tab-integrations. This is one time and can be used for all the forms. It is recommended to use the default source.
- Custom Source – If you select custom source, you can set credentials for each form you created.
3.1 Where to get Google Sheet Client Id & Client Secret?
- Go to the Google Developers Console at https://console.developers.google.com/ and log in with your Google account if not already logged in. Google may ask you to identify your country and agree to its terms of service.
- Click on Create a Project on the opening screen. Or alternatively, go to the upper-left drop-down menu to Select a project > New project.
- In the next screen, give your new project a meaningful short name to remind you of its purpose, such as
ActionsPackDemo. You do not need to create an organization or parent folder. - In the next screen, press the + Enable APIs and Services at the top of the menu. Make sure that your new project name appears near the top.
- In the next screen, enter Google Sheets into the search bar, select this result and enable the API
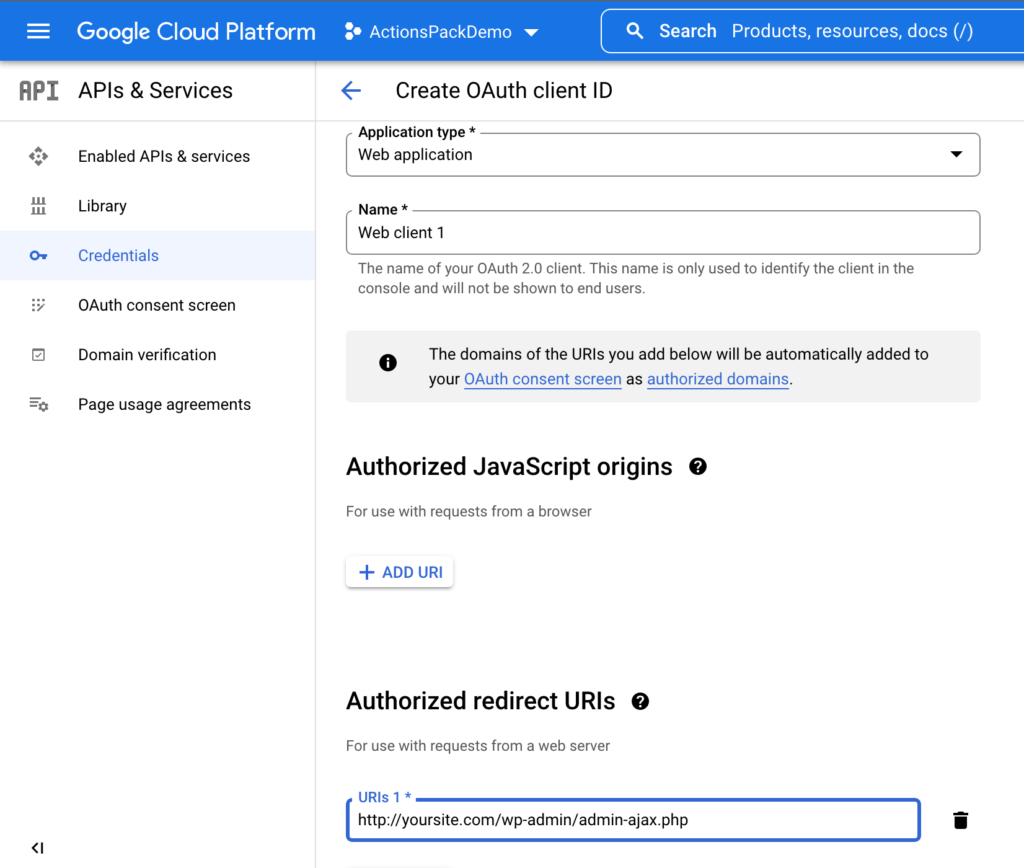
- In the left sidebar menu, click Credentials, then click + Create Credentials and select OAuth Client ID, as shown in Figure below.

- Then enter a project name as you wish. Select Web APP and enter the URI http://yoursite.com/wp-admin/admin-ajax.php in the Authorised redirect URI input field as shown in the figure below.
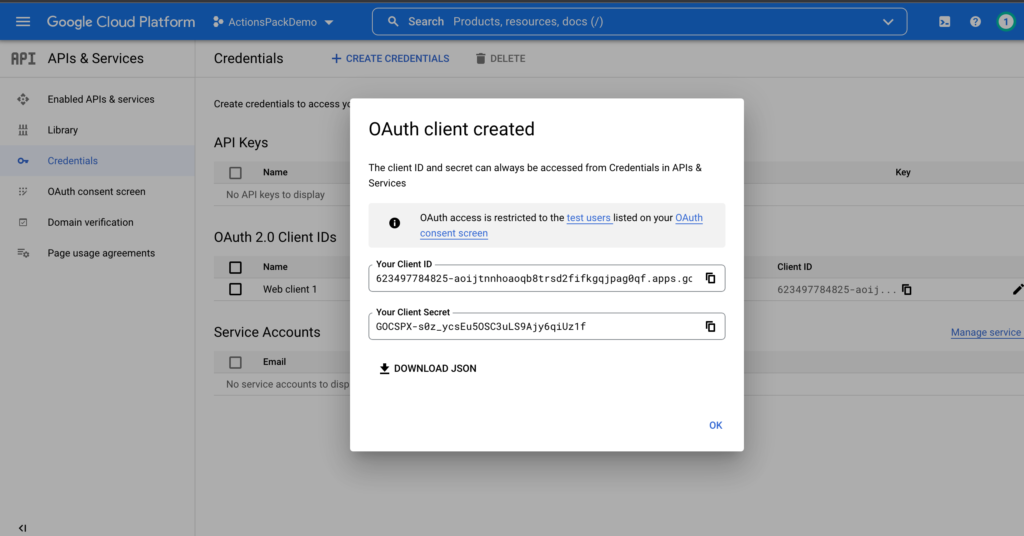
- Hit on Create the project button and you will get the client ID and Secret as shown in the figure below.
3.2 Establish Elementor Google Sheets Connection

After you copy and paste the Client ID and Secret, you need to click on the Validate Credentials button once. If everything is correct, you are good to go. You will see a green checkmark and your Elementor Google Sheets connection is successful. Don’t forget to click on the Save Changes button that in the bottom of that page.
3.3 Enter your Spreadsheet Details
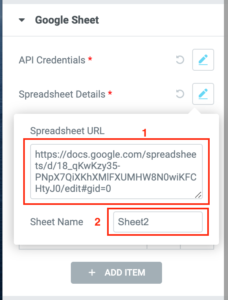
In this step, you need to enter your Google Sheet Details. Copy the entire spreadsheet URL where you want to send your form data and paste it inside the Spreadsheet URL input field. You can also enter ant individual sheet name E.g Sheet1 or Sheet2. Just keep in my mind you need to enter the exact name as it is in your Google Spreadsheet page. Also if you rename your sheet in the future you need to update the same here.
3.4 Map Elementor Form Fields with Google Sheet Columns
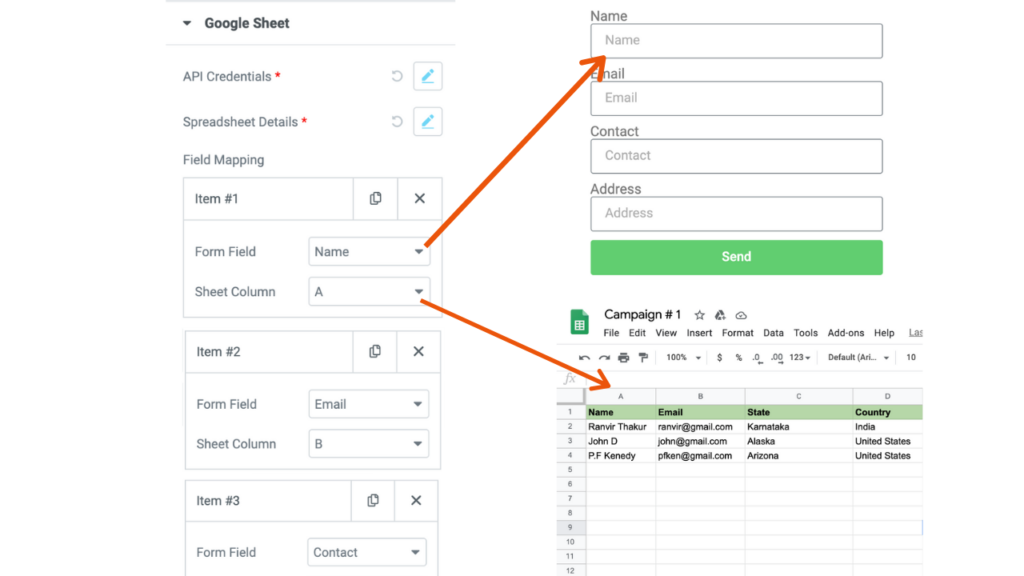
Now you need to perform field mapping between your Elementor form fields and columns of your Google Sheet. In layman’s term, you have to explicitly tell Actions Pack, which field’s data should go to which column in your Google Sheet.
Conclusion
Once you are done with your field mappings, you are ready to test your lead capture form and send data from your Elementor’s form to Google Sheet.
With Actions Pack Addon, it’s easy to create lead generation forms that connect to Google Sheets. It is faster or quicker. Neither you need to depend on other API service providers like Zapier nor you have to pay a monthly subscription for a limited number of leads collection. Actions Pack provides you the freedom to create an unlimited number of leads collection.
To get started, purchase Actions Pack and then follow the steps in this tutorial to set up the Elementor Google Sheets Integration.
Do you have any additional questions about how to connect Elementor to Google Sheets? Ask below in the comments section!
4 Responses
Hola, he creado dos formularios, uno de ellos me guarda las respuestas depués del último de las filas.
Pero el otro me lo guarda siempre el primero.
Hay opción de cambiar esto?
Gracias
Translated version of your query :-
Unfortunately there is no such option in Actions Pack to change the order of data insertion. You are facing this issue in one Sheet because you must have changed some option in your Google Spreadsheet. Kindly follow this tutorial https://yagisanatode.com/2018/03/06/how-do-i-reverse-the-rows-in-a-column-in-google-sheets/ to sort your rows in a reverse order. Otherwise the best option for you is to create a new sheet.
Can you please explain Zapier vs Actions Pack?
That is a nice question. The major differences are performance and price. Zapier is too costly and you need to pay a monthly fee. Here you pay one time that is also half of the Zapier's monthly fee. With Zapier, form creation is limited. With Actions Pack it is completely under your control. You can create unlimited number of Elementor forms and connect it to Google Sheet for each and every campaign.
Secondly, with Zapier, data process is slow. Because when you submit a form, data from your server goes to Zapier server and then again it goes to Google Server. With Actions Pack data goes directly from user ends to Google server. It is also GDPR friendly.
With Zapier, you need to integrate it with your Elementor Form each-time you want to connect to Google Sheet. There is no global option. Again and again you need to configure API and all which is a frustrating task I believe. With Actions Pack you just need to configure it once which even takes less than 1 min.