Introduction: In the realm of e-commerce, user experience reigns supreme. An intuitive, branded login process can make all the difference in customer satisfaction and conversion rates. However, WooCommerce’s default “My Account” page may not always align with your vision. Enter Actions Pack—a game-changer that seamlessly integrates with WooCommerce and Elementor to create a customized, user-friendly login page. In this guide, we’ll show you how to harness the power of Actions Pack to transform your WooCommerce login experience.
Unleashing Actions Pack for WooCommerce’s My Account Page Enhancement
Picture this scenario: you want to encourage users to log in before completing a purchase, but when they click “login” during checkout, they’re taken to WooCommerce’s standard “My Account” login cum registration page. After logging in, they’re then redirected back to the checkout page. This might not be the user experience you envisioned. In this guide, we will create a custom signup/signin page for woo-commerce using Elementor page Builder step by step
Meet Actions Pack: Your WooCommerce Login Solution
Actions Pack, a versatile lightweight Elementor Addon, that takes your Elementor’s default Form widget to the next level. It enriches your forms with various actions and options while keeping your Elementor dashboard clean and clutter-free.
Crafting a Unique Login Page for your WooCommerce Website
In this step we will create a login page or a popup using Elementor and Actions Pack and redirect your default classic woo-commerce my-account page to this newly created login page.
Let’s Design the Login Page
Begin by creating a new WordPress page titled “Login” with a url slug something like “/login”. In the next step, edit that page with Elementor and then drag the Elementor’s default form widget inside it. Although it starts as a basic form, we’ll transform it into a powerful login form soon.
Customizing the Form

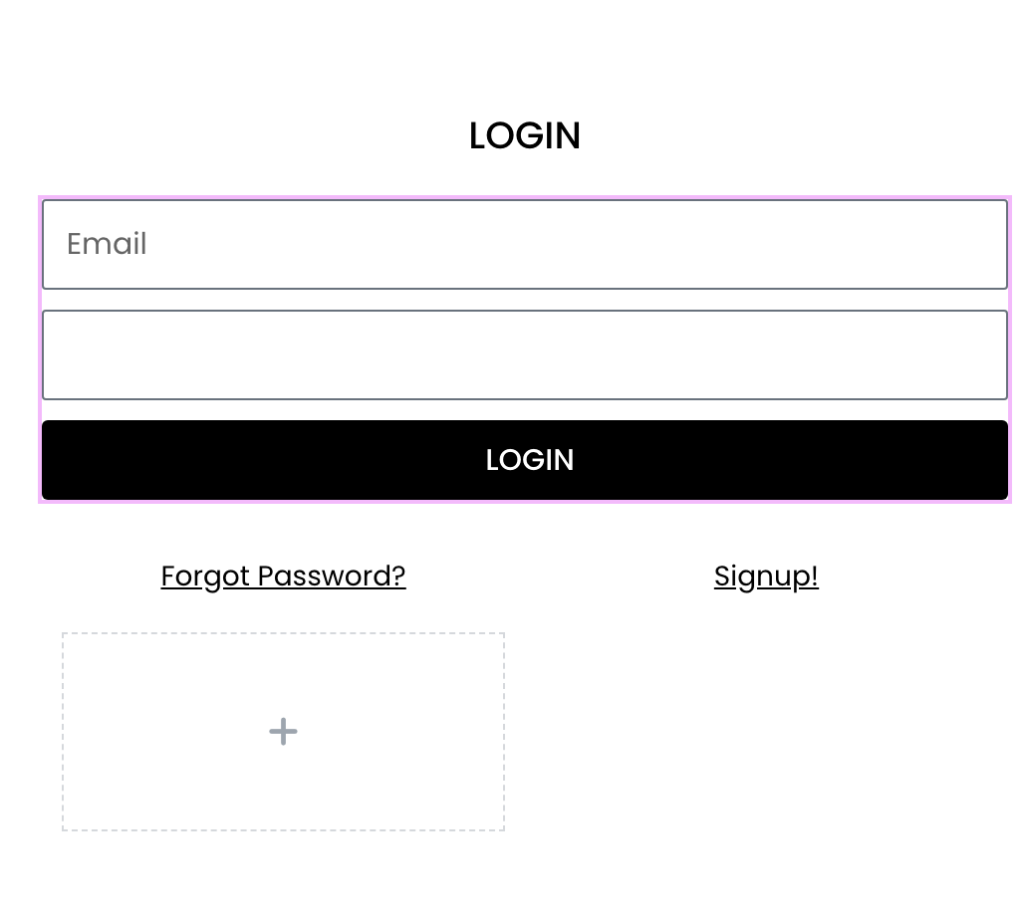
To create a basic login form, we’ll add two fundamental fields: Email and Password. While we’ve started with the login via Email, you can explore advanced tutorials for Username or Phone number-based logins.
Styling Your Form
Elevate the aesthetics by styling the form to match your branding and website design.
Configuring Actions After Submit
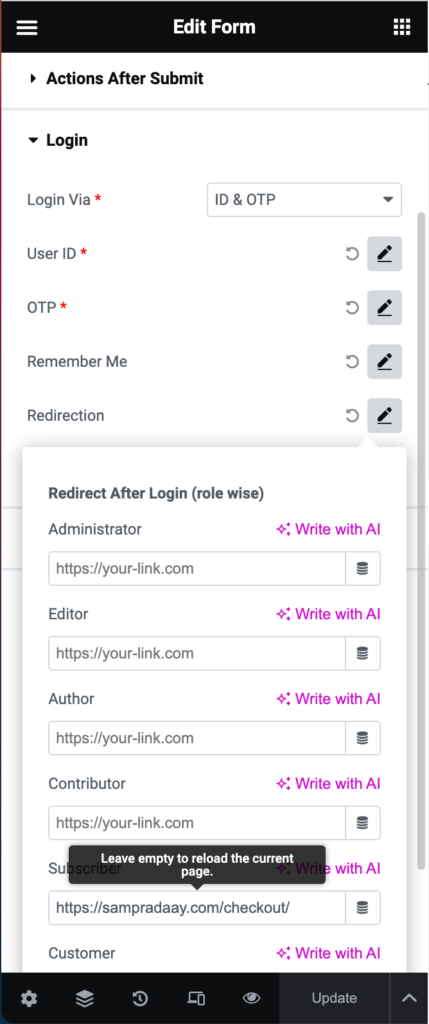
- Introducing Actions After Submit In the Elementor Form widget settings, navigate to the “Actions After Submit” section. Remove the default email action and replace it with the Actions Pack’s “Login” Action
- Mapping Form Fields To ensure a seamless login experience, map the form fields to the required login action fields. Typically, this involves connecting the Email or Username field to “User ID” and the password field to “Password.”
- Exploring Advanced Options Discover extra functionality with Actions Pack. In particular, the options for redirection and additional settings offer tremendous customization possibilities.
Mastering Redirection and Additional Settings
Role-Based Redirection Take full control of user redirection based on roles—for example, directing administrators to the WordPress Admin page and subscribers to a custom front-end dashboard or my-account page.
Customizing Redirection URLs Specify where users should be redirected after a successful login. Choose from various destinations or leave the field empty to reload the current page. Ensure you use full URLs (including HTTP) for accurate redirection.
Logout Redirection and Default Login Page Redirect Set the logout redirection URL to guide users after logging out. Additionally, ensure that visitors using the default WordPress login form are directed to your custom-designed login page, maintaining a consistent user experience.
Seamless Integration with WooCommerce
Redirecting WooCommerce’s “My Account” Page
To seamlessly integrate your custom login page created with Elementor and Actions Pack with WooCommerce’s “My Account” page, you’ll need a small snippet of custom code. This code will ensure that when guest users try to access the “My Account” page, they are redirected to your custom login page. Once users successfully log in, they will be redirected to the checkout page for a smooth and streamlined shopping experience.
To implement this custom code, we recommend using “WP Code” a free plugin. Here’s how to do it:
- Install and activate the “WP Code” plugin from the WordPress plugin repository.
- Once activated, navigate to Code Snippets > Add New in your WordPress dashboard.
- Select Add your Custom Code, click it and choose code type to php and paste below custom code and save it. Make sure you don’t forget to active the code by toggling active/inactive
- One important step, please replace your-custom-login-page with your new login page (E.g in our case /login) that you created earlier using Elementor and Actions Pack.
function redirect_woocommerce_my_account() {
    // Check if the user is not logged in and is trying to access the "My Account" page
    if (!is_user_logged_in() && is_account_page()) {
        // Replace 'your-custom-login-page' with the actual URL of your custom login page
        wp_redirect(home_url('/your-custom-login-page'));
        exit();
    }
}
add_action('template_redirect', 'redirect_woocommerce_my_account');
Now, whenever a guest user adds items to the cart and clicks “View Cart,” they will be redirected to WooCommerce’s “My Account” page, where they will encounter your custom-designed login form created using Elementor and Actions Pack. As you’ve added the custom code, they will be redirected again to your custom login page (e.g., /login).
Redirecting to Checkout Page after Successfully Logged in
As of now, you saw, guest users are being redirected to a login page when they click on view checkout page, but post login, they are not being redirected to the checkout page.
So after successfully logging in, from there, to make them seamlessly proceed to the checkout page, you need to set the redirection url inside the Login action’s Redirect Setting option for Subscriber or Customer.
Conclusion: A Unified and Customized WooCommerce Experience By following these steps and implementing the custom code, you’ve achieved a unified and customized WooCommerce login experience for your website. Users will appreciate the seamless flow from cart to login to checkout, enhancing their shopping journey and increasing the chances of conversion.
Empower your WooCommerce store with Actions Pack, Elementor, and this custom code for a top-notch user experience!