Follow this guide to create a stunning Signup or Registration form using Elementor and Actions Pack plugin. Benefit from a variety of features such as Role Based signup form, Redirect users after signup, Auto Login on successful registration, Auto Username or password, Repeat Password, Email Verification, Additional fields and more. With our easy-to-follow guide, you can create a simplified signup form having one-field or go beyond your imagination with unlimited fields and style.
Without wasting more time let’s create a Customised User Registration Form with Elementor Step-by-Step. First of all, you need to understand that you don’t need an extra widget for this. You can easily create a fully customised sign-up form using the power of Elementor’s native Form widget itself.
Let’s see how you can create a User Registration Form for your website in 5 simple steps –
Note: Make sure you already installed Elementor, Elementor Pro, and Actions Pack.
1. Create a Page or Popup using Elementor

Create a WordPress page and edit it with Elementor or you may create a popup using Elementor’s theme builder. Then you need drag and drop Elementor Pro’s default form widget to your section layout.
Note: You might be using some other plugins which adds different form widget to your Elementor’s dashboard. Actions Pack only works with Elementor’s native form widget. So you need to be careful.
2. Design your Elementor Registration Form
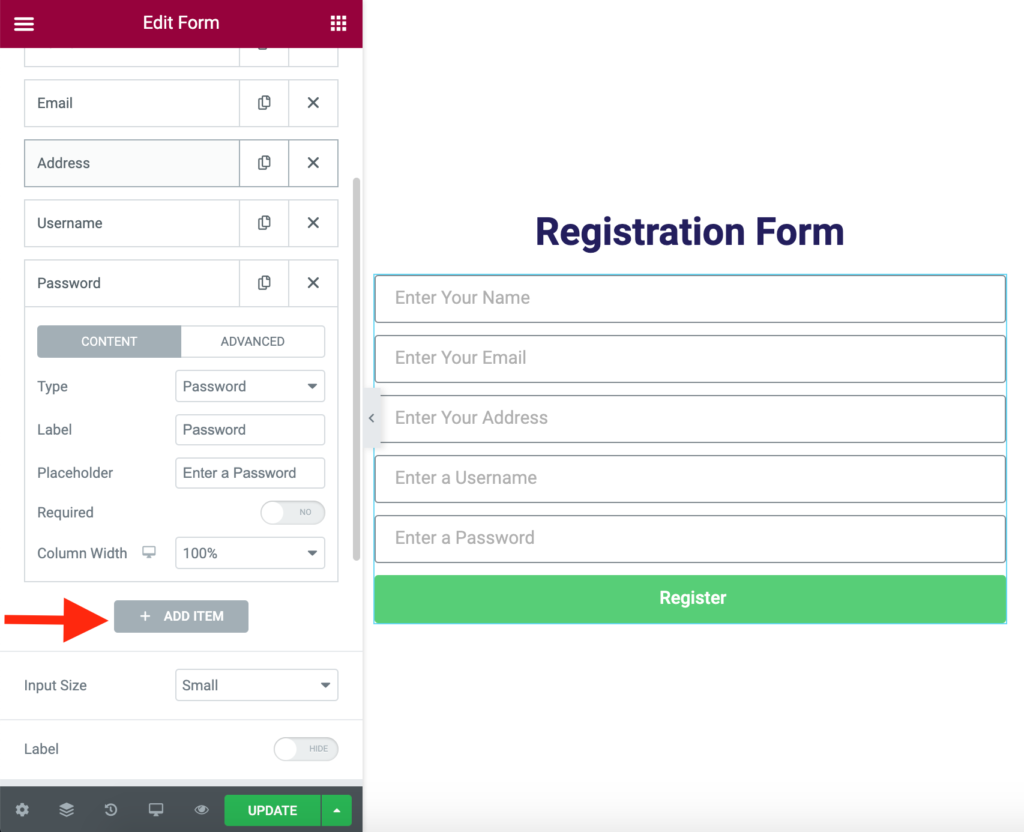
Now it’s time to create the required form fields for your Elementor user registration form as shown in the image above. Keep in mind you can create unlimited form fields like address, phone number, or anything else by clicking on “ADD ITEM”. In case you have too many form fields you may also use the “STEP” option in Elementor to create a multistep Signup form. You just need to be careful while selecting the form field type e.g if you want to create a phone field then the “type” should be “tel”, if you want to create a password field then the “type” should be “password” and so on.
Note: None of the fields are compulsory. “Username” and “Password” field can be set to “autogenerate” which we will see in the next article. For the shake of simplicity, let’s think we need a Username and Password field for now only.
3. Select “Register” action
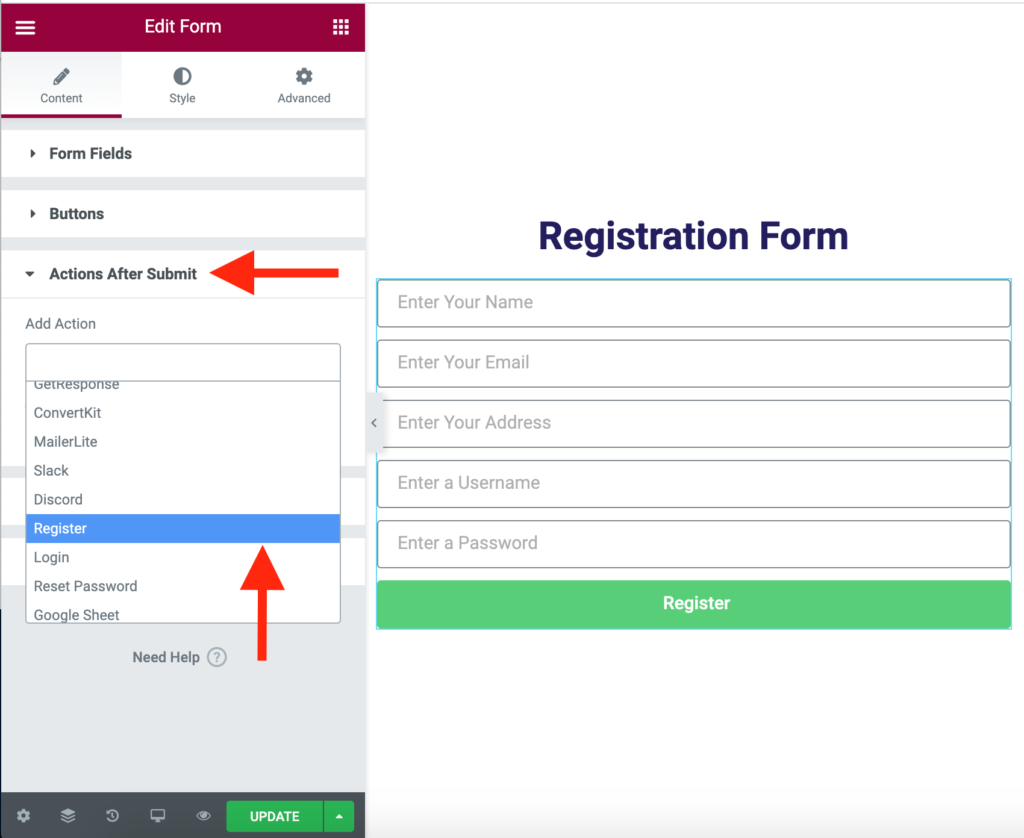
Scroll down your Form Widget a bit, you will see an option “Actions After Submit”. If you click on it, you will see a lot of actions to select from. Remove the “Email” action or any other actions and select only “Register” action. If you are not finding the “Register” Action, you might not have activated “Actions Pack” plugin in your WordPress site.
Note: You can add multiple actions like Email, Mailchimp, Active Campaign, etc along with the “Register” action. But If you are new to Elementor Form widget, I would recommend you first create your Elementor Signup Form properly, test the form by filling some details, check inside your WordPress User table if users are getting created or not, and then add other actions one by one.
4. Configure “Register” Action
Now, you need to configure the Register Action that you selected in the previous step.
4.1. Choose a user Role
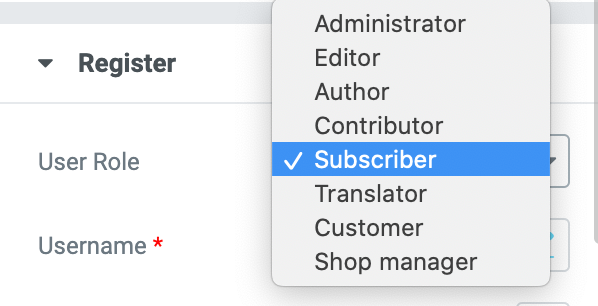
You have to choose a “User Role” so that any user registered through this Signup form can have a particular user role and have specific permissions throughout your WordPress site.
4.2. Map Form Fields
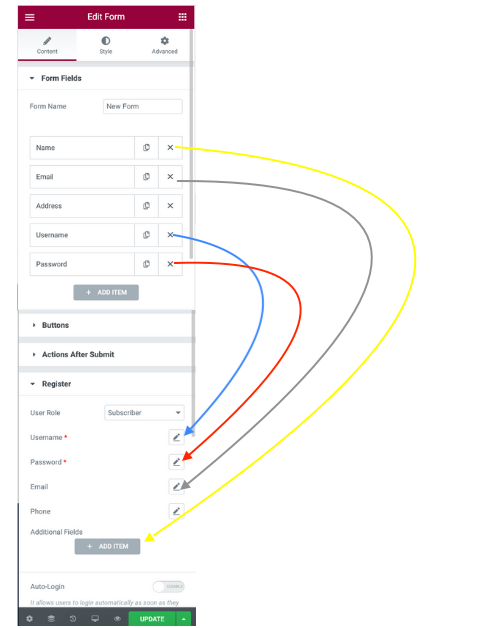
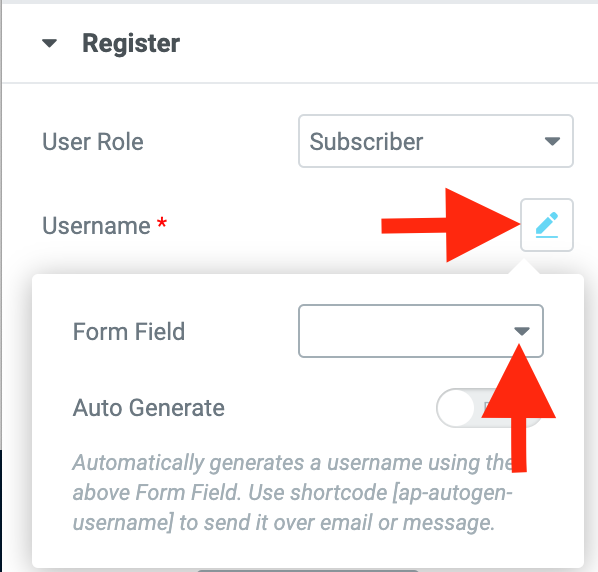

Next, you need to map your Form Fields inside Register Action. Mapping means you have to explicitly tell the “Register” Action about your Elementor Form. Which field will be used as a username, which field will be used as a password, which field will be used as Email, and so on. Simply click on the “pencil” icon next to every option inside Register Action. You will see all the form fields that you created while designing the form in step-1 are available inside the “form field” option. Just choose the correct one. Do the same for all other fields like “Password”, “Email”, or “Phone Number”.

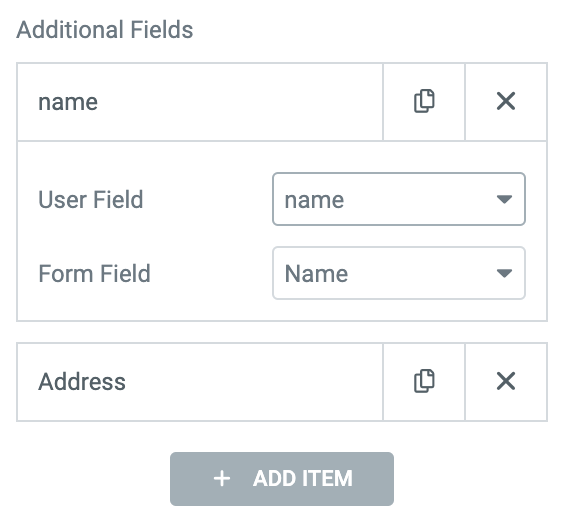
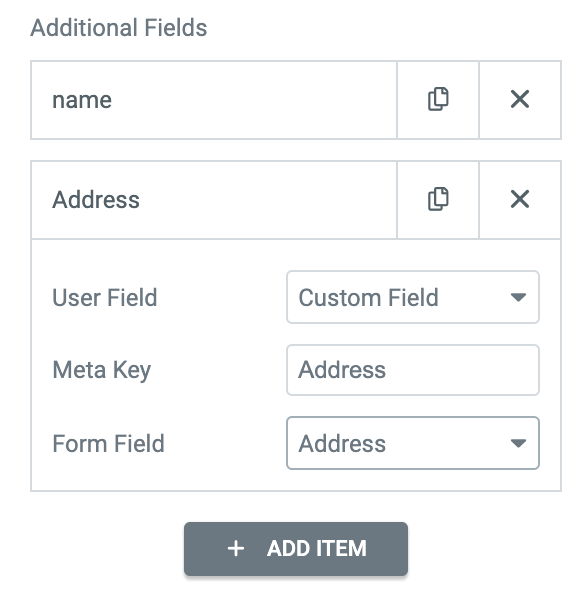
In case you have some additional form fields like “Name”, “Address”, “State”, “Country” etc you can map them inside “Additional Fields” as shown in the images above. You have to map your “Form Fields” with “User Field”. These user fields are actually called “User Meta” in terms of WordPress. There are already many default User fields or User meta keys provided by WordPress itself like “first_name”, “last_name”, “description” etc. If you don’t find any suitable meta key in the list, you can simply select “Custom Field” as shown in the image above. You don’t need any extra plugins for that. Out of the box Actions Pack creates those custom meta fields on the fly.
5. Disable Form Cache
Elementor recently launched a new feature called “Widget Caching”, that is by default on for every widget. Since, our Signup form is a dynamic form and different for different user, we need to disable the cache by going to Advanced Tab -> Layout -> Caching -> Inactive
6. Publish the User Registration Form

Now your Elementor Signup (or Elementor User Registration Form) is ready to be published and tested. While testing, be sure you have already logged out from the current user, or alternatively you should try to open your Elementor Registration page or popup in an incognito window, fill the form and submit. Go to your WordPress user Table (yoursite.com/wp-admin/users.php) and check the newly created users.
34 Responses
Hello, I set up email verification for registration in Elementor and tested it. After clicking the verification link in the email, the user is only redirected to a custom page but does not log in automatically. Is there a way to enable automatic login after email verification?
Hi, You need to enable Auto login feature on Advanced settings. Go to your Elementor Registration form -> Actions After Submit -> Register -> Advanced Settings -> Enable auto login
Hello, I set up email verification for registration in Elementor and tested it. After clicking the verification link in the email, the user is only redirected to a custom page but does not log in automatically. Is there a way to enable automatic login after email verification?
HI, I need to register users with the same phone number. Now, by default, the registration form requires the phone number to be mandatory (although the required field option is disabled) and it does not allow me to register with a phone number that is already in the database.
It is possible that the phone number field is not required, and that I can register diferents users with the same phone number.
Thx
You can simply remove the Phone Number Mapping. And add phone number as an additional field.
Hello! I want to know how to disable the display of additional fields in the edit users option, I want to handle that with conditionals depending on the user’s role. Thank you!
Hi,
I would like to send notification emails to user and to one person in the company (not the website default email address). But if I set emails in actions after submit, emails are sent even if there is a problem (for example if the username or the mail address already exists and account is not created).
You need to enable both Notification inside Actions After Submit -> Register -> Email to send email to user. If you want to send email to admin, you need to add Email action. (Also need to enable the option inside Register action -> Additional setting -> enable Stop other action when registration fails)
Hi, I just bought this plugin and I have one question. I do not get any error if the passwords do not match or the email already exists. Instead, I am just redirected to the default wp-admin page. I would like to prevent users from accessing the default login so this is really not the behavior that I want.
Thank you for your answer.
Hi, it seems you are using default Login widget. But you need to create a Login form using Elementor’s form widget with setting Actions After Submit to Login as shown in the video.
Hi
When I use [ap-verification] shortcode for email verification, the email won’t send to me . When I remove that shortcode, it works and I receive the verification email, of course without any link.
I think the shortcode has some problem.
I’ve turned on both verification and notification switches.
Please consider that
Thanks
You need to enable both Notification and Verification options that is inside Actions After Submit -> Register -> Email.
If I want to subscribe a person to an email list, is it possible to add a conditional to an action?
For instance if the visitor checks the checkbox to receive email updates, then the “GetResponse” action gets triggered. If they don’t accept the checkbox, they still register but do not get added to the list
Thank you!
Hi,
Is it possible to set conditions for password example.: One capital letter, one number, one special symbol.
Thank in advance
Hi, In the password form field go to Advanced tab and inside the pattern field enter a html regex. E.g [A-Za-z0-9]{5,9} it means the password should contain capital and small alphabets and must be minimum 5 and maximum 9 characters.
This document totally ignores adding custom fields. I have an ACF custom select field. I have added this field to the “form fields.” Specified that it is a select field. Under advanced default value, I select ACF field then use the wrench icon to select the ACF field. Then NOTHING!!! The field is not listed in the “Register” section of the widget settings. I eventually tried to add an “Additional field” under the Registration section. I selected the ACF field name and the label of the corresponding field in the form. When I publish the form the form does not display the available choices from the ACF field. Why not? Am I supposed to repeat the choices from the ACF field? If so where am I instructed to do that? If not, what am I doing wrong?
Hi, The ACF select field doesn’t appear on your registration form because Elementor unable to fetch the options data. There is nothing to do with Actions Pack. You may need to manually input the options in the form fields -> options value. And then you need to map the Elementor form select field using Actions Pack’s custom meta option. Inside custom meta, you need to enter the select field’s meta value that was created by ACF.
Can we use custom email design in user registration , forget password section to notify users? I write HTML to design it but it’s not working.
Hi, to send a beautiful welcome message on user registration or forget password, you can refer this link
Is it possible to let users select from say 2 roles (Subscriber OR Author) during registration?
Yes you can let user allow to select the role as per their choice. You first need to add the user role inside Elementor Form fields and map the form field inside register action -> user role
I dont see the field for profile picture mapping
La función de autogenerar usuario no funciona correctamente
Hello, just purchased this plugin and have a quick question: Is there a way to make a Password and Confirm Password field? I know how to make them using the tutorial but not sure how to get them to actually match and show errors if they didn’t match.
would appreciate your help
If they don’t match, it will automatically shows an error that password fields are unmatched. You don’t need to do anything. You simply need to create two password form fields.
hello,
Do i need to have username in the register field in order for this to work? I do not see anywhere to delete it.
Username is not compulsory but you need to set it to generate automatically which feature is already there inside the register action.
Is it possible to force a strong password?
Yes, it is possible. You need to go to Form Fields -> Password -> advanced tab -> Set Pattern and pattern message
why did i get parsererror when i hit register button
It seems you have added other actions along with "Register" action and those actions are not working properly. The parser error happens mostly due to Email action. Your Email server is not working properly. So kindly remove any other actions and test the form.
This was a really helpful tip for me!
Hi
At the advanced part , the mobile pattern doesn't word ?
please help ?
with best regards
Hello Zahed, kindly have a look on https://www.w3schools.com/tags/att_input_pattern.asp to understand html pattern regex. Incase you need any particular pattern. Please let us know.